Kima Cardi: Free Chunky Crochet Cardigan attern
")
If you’ve always wanted to make a chunky crochet cardigan, now is the time! Try the Kima Cardigan, a FREE pattern designed for Crochet Academy.
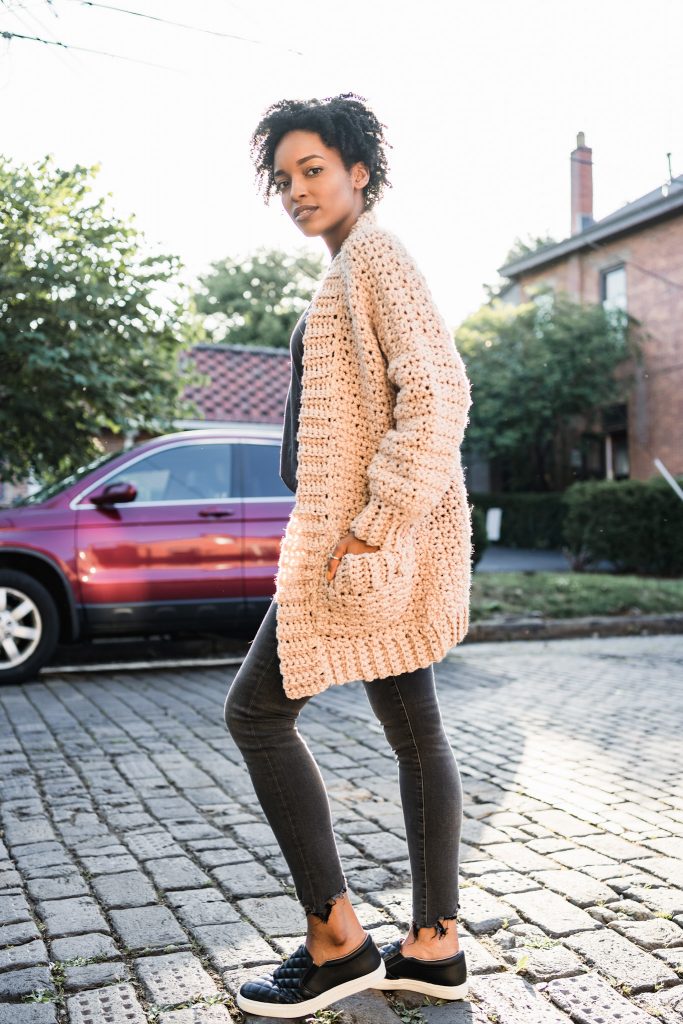
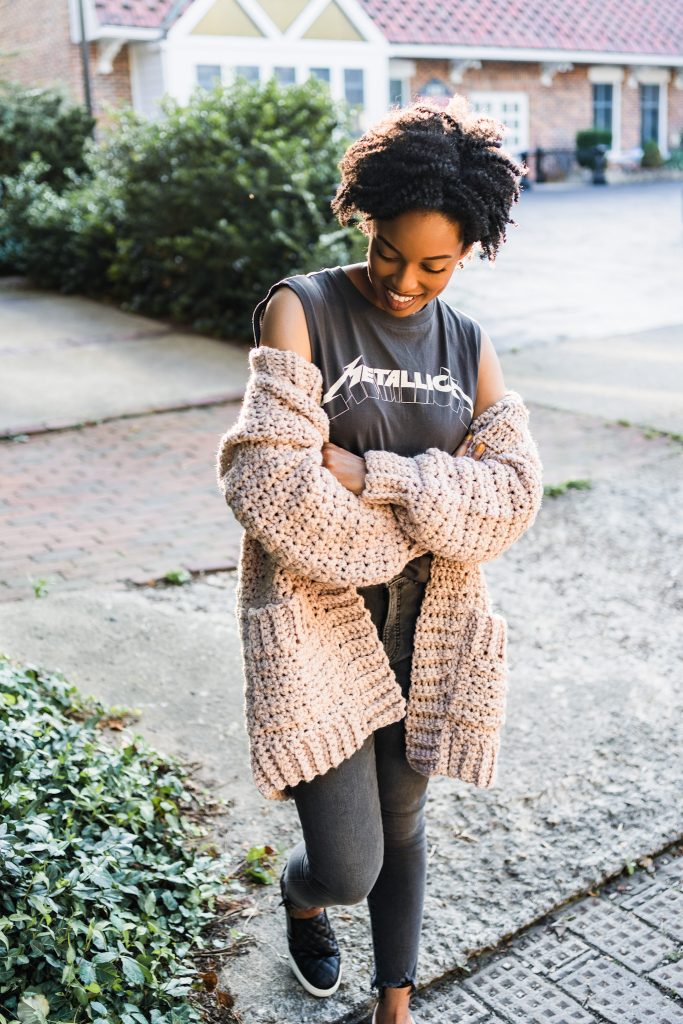
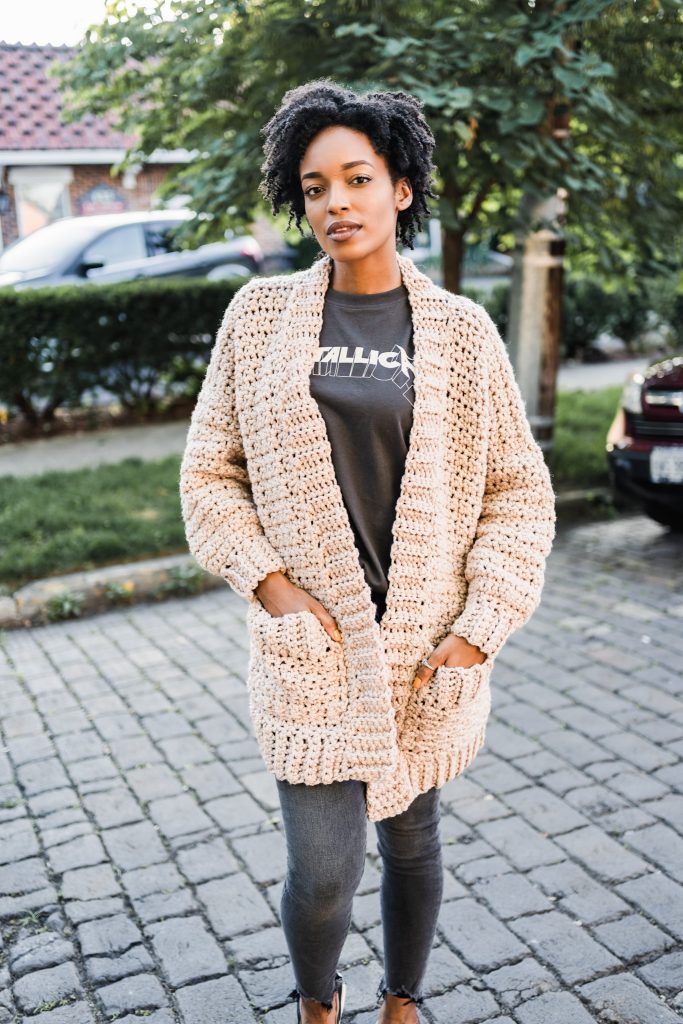
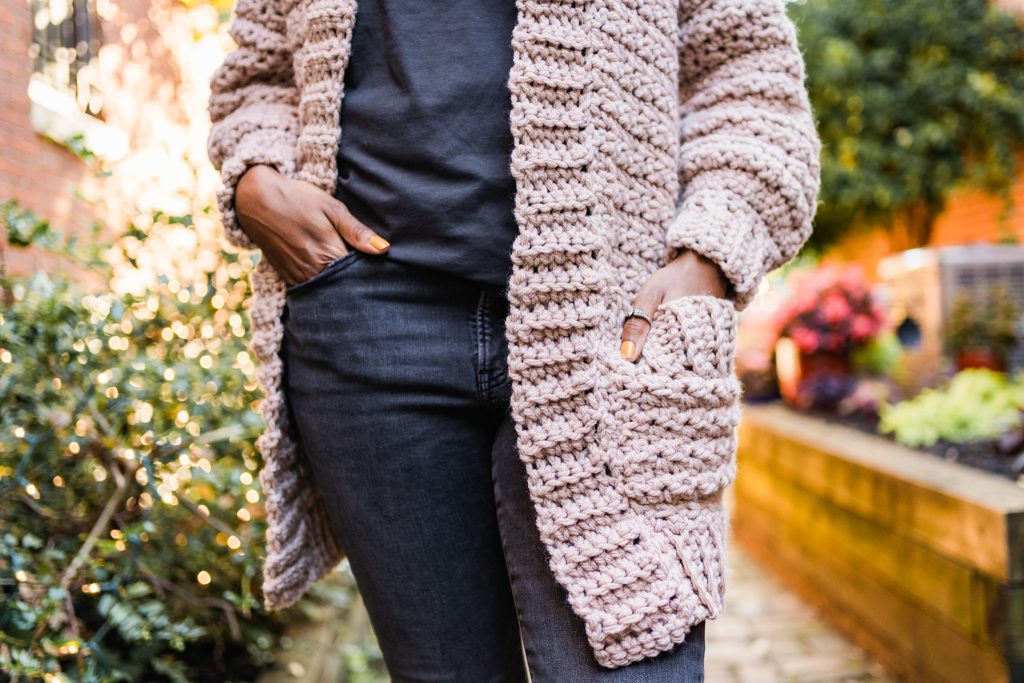
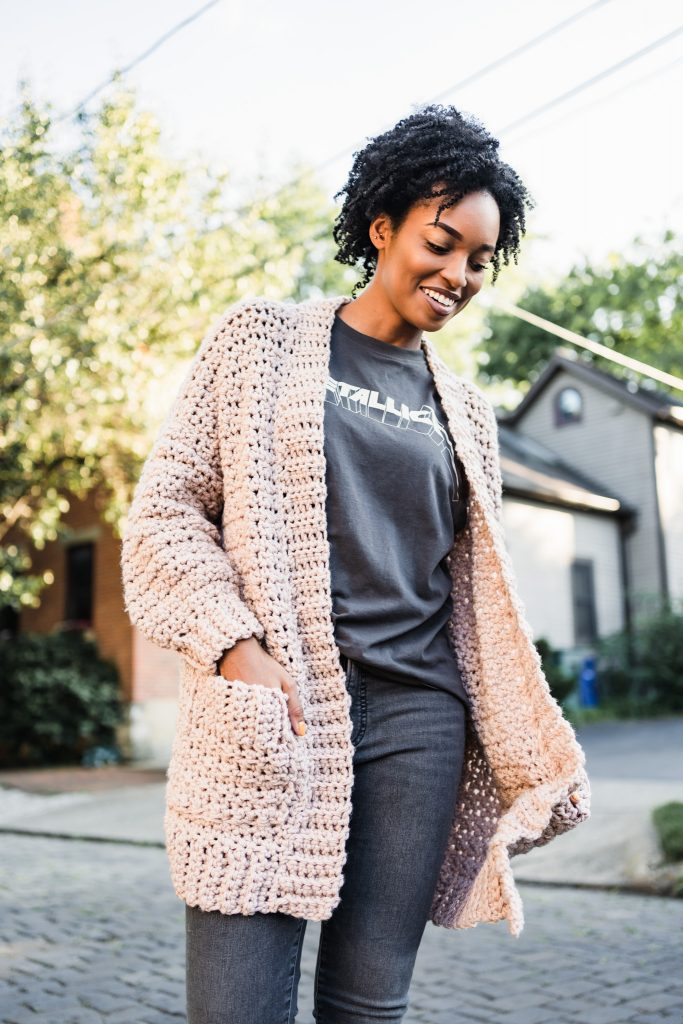
Every wardrobe deserves a chunky cardigan. Create a layered look for fall and winter with the Kima Cardi. The overall feel is comfy and cozy without being too heavy. The cardigan is constructed in simple pieces, then seamed together. The thick neckline ribbing and deep pockets are the finishing touches. Start your Kima Cardi project now with this free crochet pattern and tutorial video.
This post contains affiliate links that support the content on TLYCBlog.com. All opinions are my own. Find my Privacy & Disclosures Policy here.
PIN IT NOW, CROCHET IT LATER!

Get the Kima Cardi
- FREE PATTERN: Keep scrolling for the FREE version of the Kima Cardi + helpful totial video.
- PRINTABLE PDF: Pick up the beautifully formatted, ad-free PDF version of the Kima Cardi from Ravelry or TLYarnCrafts.com.
- CROCHET KIT: Get everything you need to make the Kima Cardi in a convenient kit from Lion Brand. Customize your kit now!
Beginner Chunky Crochet Cardigan
It’s so exciting to see beginner crocheters trying a chunky crochet cardigan as their first project. Makers are always encouraged to try small projects like washcloths as their first project, but there’s no reason you can’t start with a cardigan or sweater.
The benefit of the Kima Cardi is how simple it is. Start by making the five panels – 2 Fronts, 1 Back, and 2 Sleeves. Seam them together, then sew on the ribbed opening and a couple of pockets and you have a cardigan that you can wear!

Picking the Right Yarn
I chose Lion Brand Hue + Me to make the Kima Cardi. After using it for the Avon Throw Blanket, I knew I needed this yarn to be close to my skin. Hue + Me is a category 5 chunky weight yarn that is a blend of acrylic and wool yarns. The combination is soft but strong and is even machine washable. Find Hue + Me on the Lion Brand Website.
If Hue + Me isn’t the right fit for you, swap in a suitable substitution. A substitution should be a category 5 bulky weight, preferably with some wool, but 100% acrylic is ok too. Try to find a smooth yarn that is plied with an even color throughout the skein. Some recommended substitutions would be Lion Brand Woolspun, Brava Bulky, and Amigo Chunky.
Learn my 3 Step Method for Yarn Substitutions in this blog post.
If you want to take the guesswork out of making your Kima Cardi, get the all-in-one kit from Lion Brand. With just a few clicks, you can choose the color of your chunky crochet cardigan and add in any hooks and notions you need. Complete your purchase to get the yarn sent to our door and a PDF version of the pattern sent to your inbox.
Want to make the Kima Cardi? Customize your kit by choosing your favorite shade of Lion Brand Hue + Me. START HERE!

Get the Kima Cardi
- FREE PATTERN: Keep scrolling for the FREE version of the Avon Throw Blanket + helpful tutorial video.
- PRINTABLE PDF: Pick up the beautifully formatted, ad-free PDF version of the Avon Throw Blanket from Ravelry or TLYarnCrafts.com.
- YARN: Shop the yarn used in the Kima Cardi HERE.
Kima Cardi Details
DESCRIPTION
Whether you’re going to brunch with friends, sitting in the pickup line at your kid’s school, or heading out to check the mail, you need a chunky crochet cardigan. The Kima Cardi is a beginner-friendly, oversized open-front sweater with a ribbed collar and cozy pockets. Made with chunky yarn, this fun project works up quickly so you can make one for yourself and one for your best bunch buddy.
MATERIALS
- Lion Brand Hue + Me (category 5) bulky weight yarn. XS/S – 7 skeins, M/L – 9 skeins, XL/2XL – 11 skeins, 3XL/4XL – 13 skeins
- 10mm crochet hook (like this one!)
- Scissors
- Tapesry needle
- Locking stitch markers
- Tape measure
FINISHED SIZES
XS/S (M/L, XL/2XL, 3XL/4XL). All sizes are intended to have 12-18” positive ease. Measurements were taken after light steam blocking.
- Length: 28 (30, 32, 34)”
- Finished Bust: 46 (54, 60, 68)”
GAUGE
4” = 8 sts x 7 rows in (sc 1, hdc 1) stitch pattern
ABBREVIATIONS
Blo = back loop only
Ch = chain
Hdc = half double crochet
Rep = repeat
Sc = single crochet
St(s) = stitches
Kima Cardi Pattern
Let’s make the Kima Cardi together! Follow along in this tutorial video:
Front (Make 2)
RIBBING
ROW 1: Ch 7, sc in 2nd ch from hook and each ch across row, turn.
ROW 2: Ch 1, sc BLO across row, turn.
Rep Row 2 to 18 (22, 26, 30) rows. Rotate to work along row ends.
PANEL
ROW 1: Ch 1, (sc 1, hdc 1) across row, placing 1 stitch in the end of each row and ending with a hdc, turn. [18 (22, 26, 30) sts]
ROW 2: Ch 1, (sc 1, hdc 1) across row, turn.
Rep Row 2 until panel measures 28 (30, 32, 34)” long. Fasten off leaving a long tail for seaming the shoulders. Set Front panels aside.
Back
RIBBING
ROW 1: Ch 7, sc in 2nd ch from hook and each ch across row, turn.
ROW 2: Ch 1, sc BLO across row. turn.
Rep Row 2 to 46 (54, 60, 68) rows. Rotate to work along row ends.

PANEL
ROW 1: Ch 1, (sc 1, hdc 1) across row, placing 1 stitch in the end of each row and ending with a hdc, turn. [46 (54, 60, 68) sts]
ROW 2: Ch 1, (sc 1, hdc 1) across row, turn.
Rep Row 2 until panel measures 28 (30, 32, 34)” long and equals the same number of finished rows as the front. Fasten off. Set Back panel aside.
Sleeves (Make 2)
Work sleeve instructions for your size as indicated below.
XS/S
RIBBING
ROW 1: Ch 7, sc in 2nd ch from hook and each ch across row, turn.
ROW 2: Ch 1, sc BLO across row. turn.
Rep Row 2 to 16 rows. Rotate to work along row ends.
PANEL
ROW 1: Ch 1, sc across row, placing 1 stitch in the end of each row, turn. (16 sc)
ROW 2: Ch 1, sc 1, (2sc, sc 2, 2sc, sc 1) 3 times, turn. (22 sc)
ROW 3: Ch 1, sc 1, (2sc, sc 3, 2sc, sc 2) 3 times, turn. (28 sc)
ROW 4: Ch 1, (sc 1, hdc 1) across row, turn.
Rep Row 4 until Sleeve measures 15” long including cuff. Fasten off leaving a long tail for seaming the sleeve.
M/L
RIBBING
ROW 1: Ch 7, sc in 2nd ch from hook and each ch across row, turn.
ROW 2: Ch 1, sc BLO across row. turn.
Rep Row 2 to 18 rows. Rotate to work along row ends.
PANEL
ROW 1: Ch 1, sc across row, placing 1 stitch in the end of each row, turn. (18 sc)
ROW 2: Ch 1, (sc 1, 2sc) 3 times, (sc 2, 2sc, sc 1, 2sc) 2 times, sc 2, turn. (25 sc)
ROW 3: Ch 1, sc 3, (2sc, sc 2) 7 times, sc 1, turn. (32 sc)
ROW 4: Ch 1, (sc 1, hdc 1) across row, turn.
Rep Row 4 until Sleeve measures 15” long including cuff. Fasten off leaving a long tail for seaming the sleeve.

XL/2XL
RIBBING
ROW 1: Ch 7, sc in 2nd ch from hook and each ch across row, turn.
ROW 2: Ch 1, sc BLO across row. turn.
Rep Row 2 to 18 rows. Rotate to work along row ends.
PANEL
ROW 1: Ch 1, sc across row, placing 1 stitch in the end of each row, turn. (18 sc)
ROW 2: Ch 1, (sc 1, 2sc) across row, turn. (27 sc)
ROW 3: Ch 1, (2sc, sc 2) across row, turn. (36 sc)
ROW 4: Ch 1, (sc 1, hdc 1) across row, turn.
Rep Row 4 until Sleeve measures 15” long including cuff. Fasten off leaving a long tail for seaming the sleeve.
3XL/4XL
RIBBING
ROW 1: Ch 7, sc in 2nd ch from hook and each ch across row, turn.
ROW 2: Ch 1, sc BLO across row. turn.
Rep Row 2 to 20 rows. Rotate to work along row ends.
PANEL
ROW 1: Ch 1, sc across row, placing 1 stitch in the end of each row, turn. (20 sc)
ROW 2: Ch 1, (sc 1, 2sc) across row, turn. (30 sc)
ROW 3: Ch 1, (2sc, sc 2) across row, turn. (40 sc)
ROW 4: Ch 1, (sc 1, hdc 1) across row, turn.
Rep Row 4 until Sleeve measures 15” long including cuff. Fasten off leaving a long tail for seaming the sleeve.
Assembly
- Panels do not have a set right side or wrong side. Choose what will be the right and wrong sides of your cardigan before you start seaming.
- Lay the back panel flat and line up the corners of the front panels with the corners of the back. Using the available tails, seam the front panels to the back panel.
- Unfold the cardigan at the shoulders to lay it flat. Line up the top edge of the sleeve with the seam of the shoulder. Seam the sleeve to the cardigan.
- Fold cardigan at shoulders. Using a length of yarn, seam the side of the cardigan, starting at the cuffs working toward the underarm, then down the body.
- Weave in all ends.
Front Ribbing
ROW 1: Ch 7, sc in 2nd ch from hook and each ch across row, turn.
ROW 2: Ch 1, sc BLO across row. turn.
Rep Row 2 until ribbing measures approximately 60 (65, 70, 75)”. Do not fasten off.
Lay cardigan flat with the front opening facing up. Align the starting chain of the ribbing with the bottom left of the front opening. With the help of locking stitch markers, fasten the ribbing to the front opening evenly, ensuring that the ribbing isn’t stretching or buckling.
Continue fastening the ribbing in this way around the front opening. Add or remove rows as needed when you come to the end of your ribbing.
Using a length of yarn, seam the ribbing to the front opening. Fasten off when done and weave in all ends.
Pockets (make 2)
RIBBING
ROW 1: Ch 7, sc in 2nd ch from hook and each ch across row, turn.
ROW 2: Ch 1, sc BLO across row. turn.
Rep Row 2 to 12 rows. Rotate to work along row ends.
PANEL
ROW 1: Ch 1, (sc 1, hdc 1) across row, placing 1 stitch in the end of each row and ending with a hdc, turn.
ROW 2: Ch 1, (sc 1, hdc 1) across row, turn.
Rep Row 2 until panel measures 7.5” long. Fasten off.
With the help of locking stitch markers, align the pockets on the front panels at your desired height, being sure not to overlap the ribbing on the bottom or front opening.
Use a length of yarn to seam the pocket to the front panel, leaving the top side open. Take care to fasten the pocket securely to the panel so it will not loosen over time.
Finishing
- Weave in all remaining ends.
- Steam block lightly as needed.
Prefer an ad-free, printable version of the Kima Cardi? Get it HERE!
Whether styled over distressed denim, a pencil skirt, or leggings, you’re always dressed for the occasion when you wear the Kima Cardi. Where are you taking your new chunky crochet cardigan?
Share your projects with me on Instagram @TLYarnCrafts. Then drop by my private Facebook group, TLYC Makers, and share there too!
Find more free beginner crochet patterns here: